BubbleShare: Share photos - Powered by BubbleShare
Friday, August 8, 2008
Sunday, May 4, 2008
Email link
To put an email link on the side of your blog you will need to go to 'Page Elements' - 'add a new page element' and click the html element.
Then copy this code, substituting your email address and your name for mine.

Now when the email link is clicked it will automatically open an new email message ready to be sent to you.
Then copy this code, substituting your email address and your name for mine.

Now when the email link is clicked it will automatically open an new email message ready to be sent to you.
Viddix
Viddix is a very powerful web2.0 tool that enables students to not only present in video form, but also to attach notes, slides, images, links, polls and more.
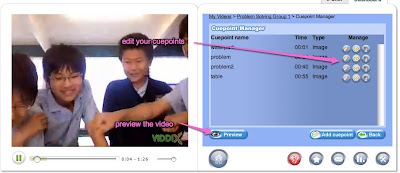
Here is a viddix I made for a maths problem solving session just to give you an idea of what it looks like.
Register on the free site and start by uploading a video clip.

Now you can put in your 'cuepoints'. These are places in the video where you can insert supporting slides.

Name your cuepoint and set the timer at the point in the video that you want the cuepoint to appear. Then select the type of cuepoint you want.

Click save and then upload the image or type in the text or link you want at the cuepoint.
You can preview your whole presentation and edit any cuepoint later if the timing is wrong, or you need to change the type.
Now you can name and publish your viddix. The little green box means it is published successfully - red box signal unpublished.

To get the embed cod of your viddix, select the cuepoint button and view it in preview mode.
There will now be a 'video info' tab. Click this tab to find the embed code.

Here is a viddix I made for a maths problem solving session just to give you an idea of what it looks like.
Problem Solvin.. 
Register on the free site and start by uploading a video clip.


Now you can put in your 'cuepoints'. These are places in the video where you can insert supporting slides.

Name your cuepoint and set the timer at the point in the video that you want the cuepoint to appear. Then select the type of cuepoint you want.

Click save and then upload the image or type in the text or link you want at the cuepoint.
You can preview your whole presentation and edit any cuepoint later if the timing is wrong, or you need to change the type.

Now you can name and publish your viddix. The little green box means it is published successfully - red box signal unpublished.


To get the embed cod of your viddix, select the cuepoint button and view it in preview mode.
There will now be a 'video info' tab. Click this tab to find the embed code.

Header Banners
Thanks for the request from NL. This video will tell you all you need to know about how to make your Blogger Banner stand out from the crowd.
Saturday, May 3, 2008
Voicethread
Voicethread is one of my favourite tools for the classroom. Voicethread is a slideshow of images that you upload, but the big difference is that others can leave comments on these pictures in the form of text, audio or video, and also use a pen tool to write on the screen.
Here's a video to introduce Voicethread to you
Now you will be starting to get ideas on how you can use this in the classroom.
You will need to go to Voicethread and sign up - it's free. This will give you 3 free voicethreads, but if you upgrade to an Educational account (also free) you can have unlimited voicethreads. You will need to apply and they will send an email to the school address you nominate to verify you are a teacher, so don't forget to tell the receiver of the email that it will be arriving.
Let's go to Voicethread and begin. Log in and click create.
Firstly you will upload some pictures you have prepared.

Each one of these pictures will be a new pages. You can change the order by dragging the picture.
You can add comments now, or you can leave it until later for others to add. Click the typewriter if you text comment, the camera if you want video comment, or the mic if you want audio comment.

Now click on the share button. You will need to make sure your Voicethread is public if you want it to be viewable on your blog.

When you are ready to embed your Voicethread into your blog you will need to get the embed code. Remember that you can continue to edit your Voicethread and it will automatically update in your blog - you don't need to re-embed it.
Click embed and pick up the code

and paste it into the html tab view on your blog, as we have done before.
A great feature of Voicethread is that you can make new identities. This means that you can make identities for each student in your class, without them needing an email address or having to register. This is wonderful for junior classes. Here is a Voicethread explaining how to do this.
Enjoy.
Here's a video to introduce Voicethread to you
Now you will be starting to get ideas on how you can use this in the classroom.
You will need to go to Voicethread and sign up - it's free. This will give you 3 free voicethreads, but if you upgrade to an Educational account (also free) you can have unlimited voicethreads. You will need to apply and they will send an email to the school address you nominate to verify you are a teacher, so don't forget to tell the receiver of the email that it will be arriving.
Let's go to Voicethread and begin. Log in and click create.
Firstly you will upload some pictures you have prepared.

Each one of these pictures will be a new pages. You can change the order by dragging the picture.
You can add comments now, or you can leave it until later for others to add. Click the typewriter if you text comment, the camera if you want video comment, or the mic if you want audio comment.

Now click on the share button. You will need to make sure your Voicethread is public if you want it to be viewable on your blog.

When you are ready to embed your Voicethread into your blog you will need to get the embed code. Remember that you can continue to edit your Voicethread and it will automatically update in your blog - you don't need to re-embed it.
Click embed and pick up the code

and paste it into the html tab view on your blog, as we have done before.
A great feature of Voicethread is that you can make new identities. This means that you can make identities for each student in your class, without them needing an email address or having to register. This is wonderful for junior classes. Here is a Voicethread explaining how to do this.

Enjoy.
Thursday, May 1, 2008
Clustrmap
Clustrmaps are a great way to see how many readers you have and where they come from. They are very affirming for children who love to see the red dots grow on the map.
To get a clustrmap on your blog you will need to register at clustrmaps first.


Fill in the form with your actual blog address where the map is going to be placed and your email address

Clustrmaps will then send you an email with a password. Use that password to log in
and the code will be generated for you.
Copy it.

Now go to your blog and click on 'Add a Page Element' on your 'Page Elements' page.

Select 'html element' and paste in the code. Now you will have a clustrmap in your sidebar.
If you want another clustrmap for another blog, you will have to complete all these steps again including reregistering.
Clustrmaps last for 1 year. After 1 year the map is archived and will start again. You will have continue to have access to the archives.
Audio
Embedding audio into your file is a little more difficult as it will require a few steps.
You will need to have your audio file ready. I find it is better to have them saved as mp3s so most players will handle them.
You will now need to upload the mp3 to internet file storage space. This can be any space - it could be your own school internet space, or it could be one of the free storage sites offered online such as -
filefreak
boomp3
and many, many more.
Once your file is uploaded you need to get the online url for the file e.g. http://www.box.net/shared/e070kfw088
Now you need to get an embed code for an audio player. Here is one you could use -

You will need to copy this carefully as I was unable to type it in for you to copy and paste - (it would have resulted in a player sitting where the code should be!)
Once your player is embedded it will look like this
There are also many sites that offer you free players, and some of them look very nice. One I have used is at podcast-player - no registration needed - just follow the instructions on the front page

by type in the url for your audio file

and they will give you the code for a player that looks like this.

Slideshare
Slideshare is a site where you can upload your powerpoint presentations, pdfs, odp (OpenOffice) and they will save as a slideshow that you can click through. Keynote presentations need to be saved a pdf first.
Register first, and click on the upload tab to upload your presentation - 50MB limit.
 Once they are uploaded you will be able to view your Slideshare as you would on Youtube. Look for the embed code, copy it and embed it in your blog as described in the Video post.

Note that your transitions, links and sound files will be lost in the upload. However, once your presentation has been uploaded you can add a podcast mp3 track to it and create a slidecast.
To get rid of those annoying and sometimes inappropriate trailers and advertising at the end of the slideshow just locate the parts of the code shown below and alter by typing in the bits in red.

Register first, and click on the upload tab to upload your presentation - 50MB limit.
 Once they are uploaded you will be able to view your Slideshare as you would on Youtube. Look for the embed code, copy it and embed it in your blog as described in the Video post.
Note that your transitions, links and sound files will be lost in the upload. However, once your presentation has been uploaded you can add a podcast mp3 track to it and create a slidecast.

To get rid of those annoying and sometimes inappropriate trailers and advertising at the end of the slideshow just locate the parts of the code shown below and alter by typing in the bits in red.

Slideshows
There are many sites where you can make slideshows for your blog. They all mostly work on the same principles, so I will only deal with a couple of them here. However, it is worth looking around at what is available to get a different look to your slideshows. There are some links at the end of this post.
Slide is probably the most popular site. You will need to register (free) and you are ready to start.
Firstly upload your images - you can upload them from your computer, or from an image hosting site, such as flickr
Make sure you have prepared them ready for the slideshow.

Now decide how you want the photos to transition in your slideshow. There are some nice effects here.

Next you can customise your design with different themes and different skins - try out a few to see what they look like.

Now all you need is the embed code to embed it into your blog using the html widget.

Another nice feature you might want to try is Skinflix. This tool allows you to make a nice looking frame or skin for you Youtube video.

There are many other sites for making slideshows. Try some of these:
vuvox
fliptrack
rockyou
tabblo
onetruemedia
Bubbleshare
Register with bubbleshare.com.
You are going to create a new album. Begin by uploading your photos to your new album. Make sure you have prepared them previously and they are all cropped and the right way up.
Now choose a theme if you desire one. Click next and then customise your pictures to your own taste.
 When you are happy with the pictures click on 'view album'
Look for the embed code - you will find it by clicking this link
It will look like this
Now embed your bubbleshare in the same way as you learnt in the previous post about videos.
Publish your post and your bubbleshare will play.
BubbleShare: Share photos - Powered by BubbleShare
If you want your bubbleshare to play in the sidebar, go to layout

and click on add a new page element.

Choose an html element,

paste in the embed code and publish.
You are going to create a new album. Begin by uploading your photos to your new album.
 Make sure you have prepared them previously and they are all cropped and the right way up.
Now choose a theme if you desire one.
 Click next and then customise your pictures to your own taste.
 When you are happy with the pictures click on 'view album'
Look for the embed code - you will find it by clicking this link

It will look like this

Now embed your bubbleshare in the same way as you learnt in the previous post about videos.
Publish your post and your bubbleshare will play.
BubbleShare: Share photos - Powered by BubbleShare
If you want your bubbleshare to play in the sidebar, go to layout

and click on add a new page element.

Choose an html element,

paste in the embed code and publish.

Video
Adding video to your blog is easy. You can add someone elses video that you have viewed on the web, or you can add your own video.
If you are wanting to add your own video, you must first of all upload it to the internet. You can upload it directly to blogger by clicking the video button and uploading as you would an image. If you choose this way then you need not read on, but if you want to use your video on other or multiple sites then you will need to upload to a video hosting site, such as youtube, teachertube, googlevideo, schooltube, etc. Just make sure your video is in the correct format (.mov . flv .avi etc) and upload following the instructions on the website.
Once the video is on the internet and viewable then you need to embed it into your blog.
The way you do this is the same for all sites. You need to find the 'embed code'. It will be somewhere on the same page as the video is when it is being played.
For the major sites it will look something like this:
Youtube -

Teachertube -

Google Video -
 Schooltube -
Now that you have the embed page you need to put it on your page.
Look for the 'edit html' tab on the top of the page on which you are writing the post. Click this tab.

Don't worry if the text now looks like goobledegoop - you don't need to understand it.
Scroll to the end of the text and paste in your code. It will look something like this -
 Now just publish your blog and your video will play inside it.
Great job.
If you want to turn off the sometimes inappropriate trailers that appear at the end of a youtube video you will need to locate the code as below and insert the red text (&rel=0) exactly as it appears in the picture below (the xxxx will be numbers).

Subscribe to:
Posts (Atom)
